Drawing buildings with colored pencils
Drawing buildings with colored pencils can be a fun and rewarding experience. If you're looking for an easy colored pencil drawing project, this article provides helpful tips and techniques for realistic drawings of buildings with brick and dry stone walls. When including buildings in landscapes, it's not necessary to include every brick or detail. Instead, focus on creating an impressionistic style.
In the UK, houses are generally built from brick or stone and they have tiled or thatched roofs. The buildings in your area may use different materials, but I hope the information given here will get you started.
To begin, study the photos provided and observe the different building materials and how they affect the look of the structures. Then, venture outside to look at similar buildings in your vicinity, and try your hand at drawing with colored pencils.
Then there is an introduction to drawing a brick archway followed by a dry stone wall on this page.
There is a separate page devoted to drawing a roof of various types and you will see buildings and a bridge in both the Brokken Bridge and the Allerford demonstrations. For the ultimate in drawing stones check out the Bowerman Stone.
Drawing buildings with brick walls
Our first four photographs to study are brick walls. If you try to draw these without some sort of reference, the picture you have in your head will probably be of rectangular shapes positioned in an overlapping pattern, and probably terracotta in colour.
As you can see from these photos, this is not really the case. The edges of bricks crumble and wear, causing rounded corners. They vary in colour and also have mortar in between or gaps where the mortar has fallen out. Then, of course, there is the surface texture with pits, lumps and bumps.
The way light plays on these textured surfaces will cause shadows, but because the bricks are not shiny, there will be few bright white highlights.
Look at these examples and try to describe what you see.
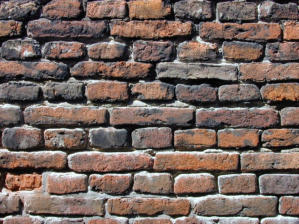 Deep mortar lines showing dark shadows in the sunlight
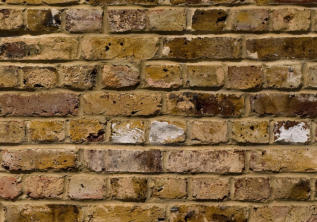 Lines of sandy colored mortar and sandy bricks. In some cases only the shadow shows where the mortar line runs
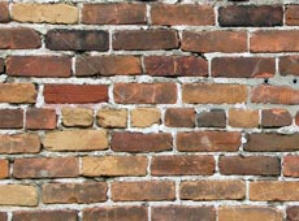 Mortar with only very shallow indentations, but very visible through the use of white mortar. Note the varied colour bricks.
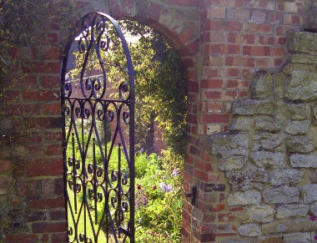 Old stone wall partly rebuilt with modern brick
Build your own library of research material
Don't just stick to these photos, investigate the buildings in your own environment, even photograph small sections of the wall if you can. This will help to build up your own library.
Note to yourself whether the buildings where you live are like those in the next village, town, or city. If they vary, what is the difference? Is this due to varying building methods, or does age play a big part?
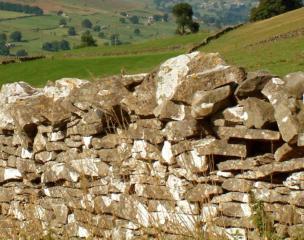
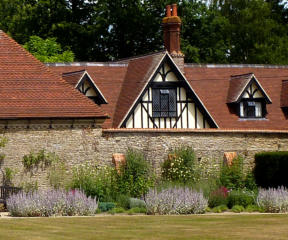
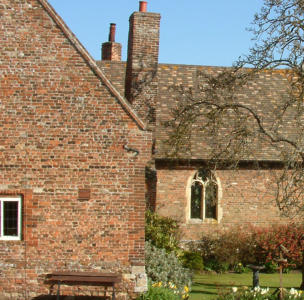
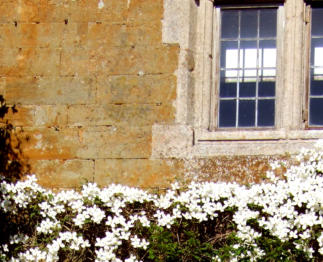
Not all bricks are alike!
Bricks are made of natural materials, so their colour and texture can vary from one day to another. This will depend on the weather and the environment in which we built them. They can contain many minerals, including iron, but baked clay is more common for making bricks.
Modern bricklaying methods incorporate 18% mortar, which can vary in colour and consistency. This helps the bricks to stick to their building structure. It is important to remember to draw the mortar and the bricks.
We can lay bricks without a mortar between courses, but the major benefit of using the mortar is that it prevents rain or moisture from seeping into the building. Mortar can also lead to uneven surfaces, as it changes over time, particularly if there is a lot of moisture in the environment.
Older walls often show much less mortar was used, with the bricks fitting together tightly, leaving no recesses or shadows. When drawing buildings like this, you can get away with the odd line to show that the builder made them of separate bricks.
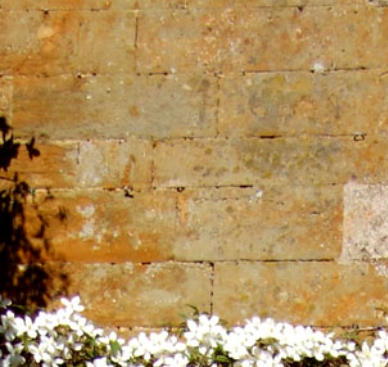 Quarried from the local area, the stones in this building have identical colour and weathering.
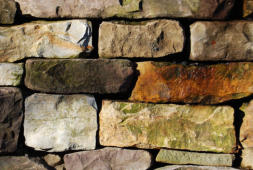 Where stones are imported from a wider area and cut to fit, we can get some quite interesting wall effect.
When drawing buildings observe..
- .the general colour and how each brick differs in tone and hue
- whether they were new bricks or re-used
- how deep the mortar line is inset and what colour it is
- how the shadows appear at the edge of each brick because of the ambient light
Look again at the first photos on this page. Did you notice how you can see the side face of some bricks and the smaller ends of others? This method strengthens the wall by bridging two lines of brick and provides a cavity for insulation. Although I am not teaching you how to build walls, a little understanding can help when you are learning colored pencil techniques for drawing buildings made from brick.
Peter's method of drawing buildings with brick walls
When drawing brick walls, it's important to remember to draw the mortar as well as the bricks. You don't have to show every brick in your drawing; an impression of bricks will suffice. Peter's method is to begin by indenting lines into the paper for the mortar with an empty ball-point pen, stylus or bone folder. Then, build up variation in color and add shadows where required to represent the textured surface. Ensure your drawing follows the rules of 2 or 3 point perspective.
Then put down your first layer of colored pencil holding the pencil on the slant so that the point doesn't go down into the indented lines, leaving them paler.
Now build up variation in the colour and add shadows where required to represent the textured surface.
Drawing a brick archway in colored pencils
The following mini demonstration is a segment of the full tutorial called Garden Arch by Peter. He explains...
I will use this colour pencil drawing to show how I drew the lines of bricks and areas of stone framing the garden beyond. I didn't spend too long on each brick, merely enough to get a believable impression. The details will come later.
It is difficult to get a sense of scale in the arch itself anyway, with the drawing being rather small. So, rather than try to draw everything to scale, I depicted it as roughly as I would have liked it to appear in real life.
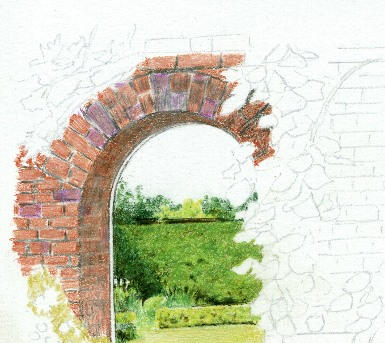
The first image (above) shows that I have laid the overall colour down with areas of mortar left white. Note that the bricks can have lighter areas on the surface where they have aged.
Check which direction the sunlight is coming from and make sure that all your sunlit edges correspond. The lit edge of each brick will usually be the top edge where it stands proud of the mortar. But some bricks will be uneven and have raised projections that will catch the light and cause shadows on the unlit side.
Check your reference carefully to see how the light hits the bricks as they turn a corner or slant, as in this example archway.
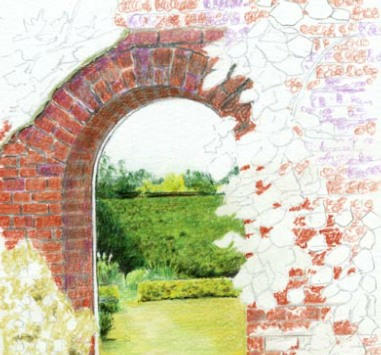
Once you are sure that the lines of bricks are drawn correctly on your paper, you can build up the colour - as in the next image (above).
At this stage I have imagined where the lines of mortar will continue behind the creeper which is not yet drawn. This enables me to keep the lines consistent and more believable once the greenery is added.
I try to avoid using black colored pencil to show the shadows. Instead, I use darker reds and violets, or the complimentary colour, (which with red bricks would be green). Other colours used in this example were sepia and indigo blue, especially where the creeper is leaving a deep shadow.
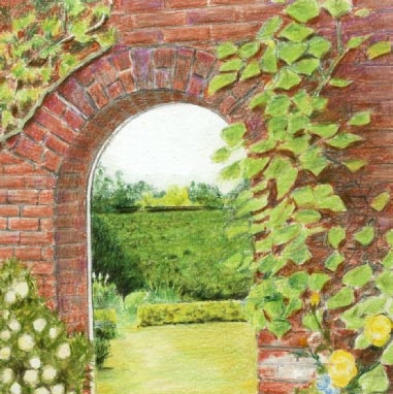
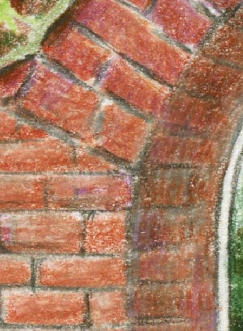
When you are drawing buildings or walls with lines of bricks, there is no need to complete each brick - unless that is your preferred style. An impression of bricks will suffice with just a few carefully completed at critical points in maximum focus (where you expect your viewer to look most closely).
If you are drawing buildings that have walls straight in front of the viewer, you can ignore the perspective, as the lines of mortar will be horizontal and usually evenly spaced.
In most cases, however, the view will involve a building or wall at an angle to the viewer and life gets a little more complicated when perspective comes into play. You need to have a basic understanding of how lines converge as they recede and how the angles work. There is a section on perspective on the site. If you are not totally clear about vanishing points and perspective, then please read through that section - it should help a great deal with you getting convincing brickwork.
The image below gives a simplified view of a line of bricks. First, note that the ‘horizontal’ mortar lines are not horizontal. I show them at different angles, converging on a point to the left (about 18 inches away on my original).
This point will be at eye level in the distance and may be way off the paper - it depends on the angle I site the wall to the viewer. This is called the ‘vanishing point’ - where the wall vanishes from view. The horizontal length of each brick gets greater as it gets nearer to the viewer. There is a way of calculating this exactly, and it I explain this in the section on perspective, but I have merely drawn the spacing by eye here.
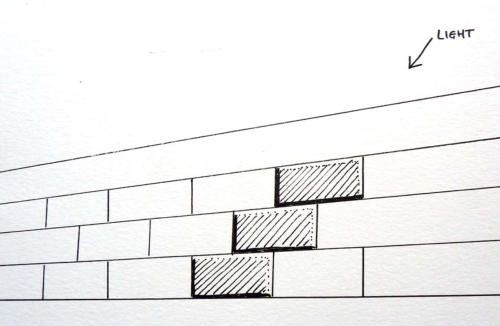
The point of this drawing is to highlight the fact that you need to sketch light lines on to the working surface to get your perspective right before you work the bricks. The next step is to ensure that you leave the light edges (above and to the right in my example) in either white or light colored pigment and - after shading in the mid tone, apply the shadow (to the bottom and left edges in my example). This gives the impression of the inset mortar and the raised edges of brick in your colored pencil art.
Dry stone walls
Let's now look at the process of drawing a dry stone wall, such as may be found in the landscape when drawing buildings situated in Scotland or the North of England.
Dry stone walls are made with no cement and rely entirely on the skill of the craftsman to use local materials found in and around the farm. Larger stones are used as the base and then progressive layers of stones are fitted into the wall to make a solid structure to keep animals in designated areas.
On land where the only natural resource is the stone lying around, this makes a good barrier which can last for 100 years or more with occasional maintenance.
As you will see from these examples from the Yorkshire Dales near Richmond, the stones weather and show areas of light and dark - but all very much in keeping with the landscape.
The different angles of the stones give the wall form as the light plays on them along with the shadows within the gaps between.
This makes it much easier to reproduce as the technique is to first apply the lightest colour, then apply successively darker tones finishing off with a final layer of your darkest tone in the deepest shadow areas. Again, try to avoid using black.
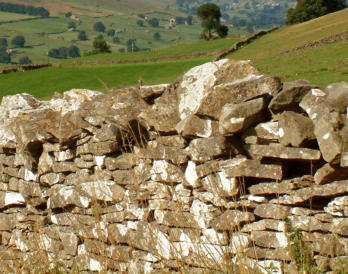
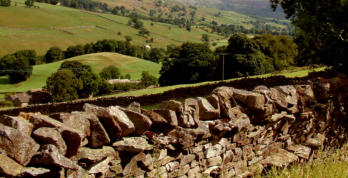
Note how the wall is constructed in layers with a final topping of stones laid vertically. In the photo (top) above there has been some aging of the wall with some loss of stone to the near right. The wall may have been lightly repaired but the lines of stone as originally laid are now disrupted and this gives some foreground interest.
Drawing a dry stone wall
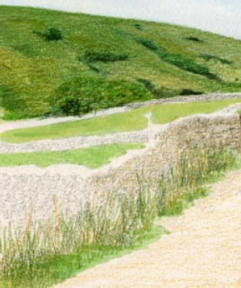
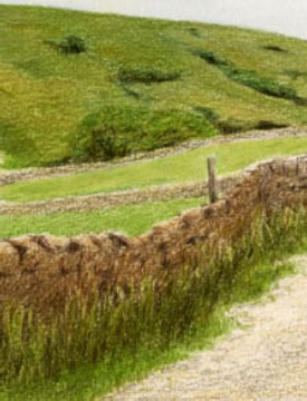
Here is an example of a dry stone wall worked in colored pencil on a Hot Pressed Watercolour paper.
The paper has some grain to it, so the effect is to duplicate the gritty effect of the stone where the pigment hits and misses the surface.
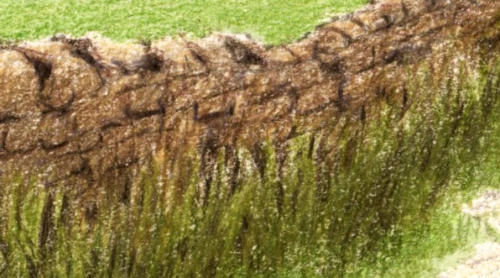
Note how the lower portion of the wall is shadowed to highlight the long green grass. There is also deep shadow in the lower parts of the grass which brings up the light catching the long grass tops.
The grass is drawn in with long vertical strokes, the wall stones are generally (but not always) horizontal and follow the line of the wall
The top of the wall is lit by the sunlight and the areas of shadow give shape to the individual stones within the wall.
The last image shows the detail larger than it is on the actual painting.
Try to select a reference that has good areas of contrasting light. Here, the foreground shadow emphasises the sunlit grass in the field beyond.
Although you might like to include a ruined building in your landscape, it is also handy to learn how to draw a roof. Clicking on the link will take you to our page where you can take a close look at tiles and thatched roofs.
By following these tips and techniques, you can create realistic and believable buildings in your colored pencil drawings
- Home
- Landscape drawing
- Drawing buildings


