Pastel pencil sharpening
Pastel pencil sharpening is a subject that often comes up when this medium is discussed on Facebook or in artist forums.
First of all let us look at two pastel pencils.

What a sharp pastel pencil does NOT look like!
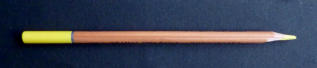
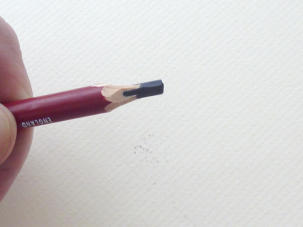
What a sharp pastel pencil DOES look like!
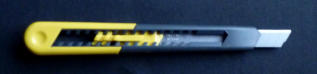
What to use to get from picture 1 to picture 2.
It seems obvious, I know, but if you had walked round classrooms as many times as I have and pointed out to students (as many times as I have), that they will never get a quality result with a poor quality point on the pencil, you would understand the reason for me making this note at the outset.
Using a blunt pencil is like trying to paint a watercolour with a yard broom!
You need to have complete control over the mark you make, and you can only do that if you know exactly where the mark is going and how big the mark will be.
Yes, I know that when you are laying down areas of background and putting down a base coat it is not so vital to keep the point pin sharp, but keeping a good point is a very good habit to get into.
In addition to the need to know how to sharpen the pencil to a good point, you also need to know how to keep the point sharp when you are using it. Maintaining a point on all pencils requires a similar technique and I have quoted the method elsewhere but will repeat it again here:
When using a good sharp pencil (of any type), make sure that you keep giving the pencil a slight turn as you use it. This introduces a fresh edge to the point and keeps the working area of pigment in fine ‘tune’. Constantly rotating the pencil makes sure that you are able to make exactly the mark you intend.
Remember though that you also need a waste container to put the rubbish in, and best of all, one that does not easily knock over. I have a small piece of blu tac on the base of the table top pot I take around with me so that an accidental knock doesn’t result a load of mess.
The process of pastel pencil sharpening in detail
I have been asked to go through the process, step by step, of sharpening a Pastel Pencil with a knife.
This is something I was taught to do many years ago by a superb teacher, Colin Bradley, as the first step in working with this medium. It may seem to be very basic to some of you, but you would be amazed how many people I see working with pencils that have virtually no point to them.
It is a sad fact that Pastel Pencils wear down more quickly than almost any other pencil medium, so you have to be on the alert all the time to keep the point in ‘tune’. If you don’t, the marks you make will become wider and less accurate. Colin always sharpened his pencils with a single edged razor blade, but these days very sharp craft knives are available which are much safer to use.
I start with a broken pencil.
For this I have selected one from the Derwent box - the Indigo , but the technique is the same whatever the colour or brand, Some pencils are softer and require more care in cutting, some of the harder ones will take more pressure on the colour core. It is a case of ‘know your pencils’.
I chose the Derwent to demonstrate this process of pencil sharpening as these are slightly softer than many other brands, so they need a little more care. Some of the harder varieties will take careful sharpening in a hand driven spiral cutting desk sharpener, which I talk more about on the pencil sharpening page in the wax pencil section.
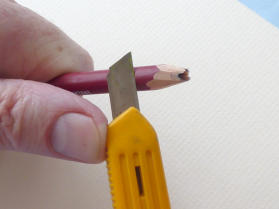
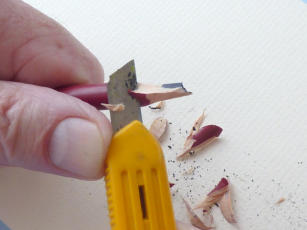
Note how I have the pencil held firmly in my hand and I can use my thumb to guide the craft knife.
The grip is a balance between the thumb and the other hand holding the knife so that movement is controlled with care.
I am also avoiding any sideways pressure on the pastel pigment core as the pastel is more delicate than either a graphite or a traditional coloured pencil. Too much sideways pressure is inclined to break the point.

The knife blade slices into the wood in a curved motion. I want to cut away wood without cutting too much of the core away.
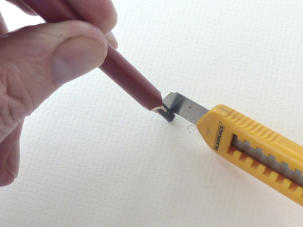
So I now have a clear section of core and I can consider bringing this up to a point.
Of course we sometimes use the pencil with a flat surface to the pastel, and sharpening up to a fine point will be quite wasteful of the media in this case.
I usually keep a good point on all my pencils though, as they are mostly used to work detail after starting off with woodless hard pastel sticks.
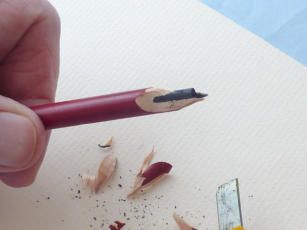
To keep sideways pressure from breaking the new point, I now rest the tip of the pencil on a hard surface which has some grip. I have used a piece of scrap mount board today to rest the point on.
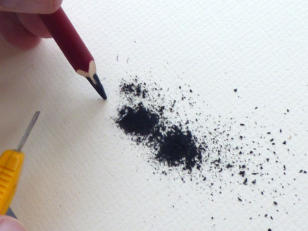
Using careful downward strokes, I remove pigment as a powder and keep turning the pencil as I work. This produces a fine point and a low chance of the point breaking.
You can save the powder in little pots and use it for the initial stages of a work, rubbing it into the clean pastel paper surface, but I don’t bother. I have too much pastel ‘bits and pieces’ saved already. You can see that the final stage does remove quite a lot of the pastel, though.
I recommend that you try to get used to the above method of pencil sharpening. It is economic to use and once you get the technique, it produces the most reliable point, in the shape you want, without the risk of breakages from a machine.
However, many folk find sharpening with a knife difficult.
The Derwent Pencil Sharpening stand and knife set may be an option that makes it easier.
These work well if you have a problem holding and using a knife as they provide a good base to hold the pencil while it is cut with the sharp craft blade. I take one or two with me on courses, and some people find them helpful, particularly if they suffer from arthritis.
I must admit I prefer to sharpen pastel pencils as shown in the demonstration above, it is just a question of what you find helpful to keep a good sharp point on your pencil.
What are the alternatives for pastel pencil sharpening?
Firstly, I can suggest what NOT to use.
Powered sharpeners with spiral cutters do work for a while, but the pencils tend to jam up the cutters with powder and when a fragile lead breaks inside the cutters it can be difficult to take the machine apart to clean out the point space.
Some machines like the Jakar 5151 (referred to in my wax pencil sharpening topic) can be taken apart, and the cutters replaced, but the operation is not easy. The Big Swordfish machines referred to in the same article are impossible to strip down and clean out.
Overall, the powered machines tend to apply too much vibration to the fragile colour strip in a pastel pencil and considering the price and need for a power source, I will discount them.
This leaves us with hand operated machines.
Ones with a single blade will blunt quite quickly against the abrasive content of pastel pencils, and a blunt blade will be likely to break the point being cut.
This is why I will always stick to my craft knife method of pastel pencil sharpening.
You might like these
Pastel pencil drawing
Pastel pencil drawing step by step - Annecy Reflections - created for Caran d'Ache
Pastel pencil brands
Pastel pencil brands available in the UK - how do they differ?
Pastel pencils basics
pastel pencils - Explore the distinct characteristics that set them apart from traditional colored pencils and learn how to use them in your artwork


You might like these
Pastel pencils basics
pastel pencils - Explore the distinct characteristics that set them apart from traditional colored pencils and learn how to use them in your artwork
Pastel pencil tutorial for beginners
A pastel pencil tutorial for beginners - learn how to blend and then paint a simple still life
Pastel pencil drawing
Pastel pencil drawing step by step - Annecy Reflections - created for Caran d'Ache
- Home
- Pastel Pencils
- Sharpening pastel pencils
Would you like our occasional newsletter?
Home | About Us | Contact Us | Privacy Policy
Copyright Peter Weatherill and Carol Leather - 2009-2024